Kitchen(ette) remodel Total Page Hits: 3397
Post Type: Technical/Project
Boat Part: Cabin/Storage
Date Modified: 07/02/2019 10:37 PM
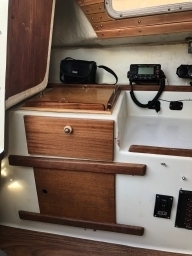
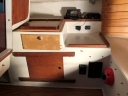
The kitchenette in a 17' boat might be one of the more ridiculous things I've seen. Our last boat was a Dolphin 24, and its galley never got used. The M17 is even less practical. And the silliest feature is the sink.
All we used it for was to store things, which, judging from what I ultimately pulled out of the drain hose, is all it was ever used for: lots of dirt, a AA battery, and three keys in advanced stages of decay. I decided I wanted more practical storage options.
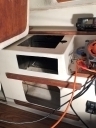
I started by taking a Dremel to it. I used the rotary cutting wheels. They work well but are very sensitive to angle. If you pinch them they stop turning and you can break the wheels pretty easily (they're cheap). Cutting out the sink was easy in parts because the Dremel could be inside the sink and allow the wheel to be perfectly perpendicular. The corners were harder. I cut the hose and took the sink out.
(As a side note, I'm fairly sure the hose was original and it was absolutely solid as a rock. No fatigue.)
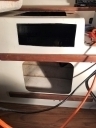
Next I cut a slot for a drawer in the face. It's really hard to get things square and, of course, I had to choose what existing lines to be parallel to. I went with parallel to the top of the cabinet, at the cost of being at an angle to the sliding door below. I actually recut it a tiny bit after the photos below and got my lines straighter, but ultimately I put a plastic trim on it that hides my errors.
(Note: I used a mask and a shop vacuum going the entire time, but I still ended up super itchy.)
The drawer slot is cut about as big as it can be without the drawer running into the companionway. I also wanted to leave enough fiberglass to be reasonably strong. I'm not sure it would have worked to give enough clearance below, but if I'd cut the sink along the vertical surfaces, just below the rim, it would have left the whole thing a lot stronger.
With open access I was able to get down to the sink drain hose easily, but it was still brutal getting it off. A knife, a pair of pliers, and side cutters for the wire in the hose. And a lot of care to not slice a finger off. I can only imagine how hard the job would have been without my extra holes, just working through the sliding cabinet door. Probably have to use a cutting wheel or something.
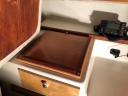
The new cabinet top is a nice piece of 1/2" plywood with maple veneer. I put mahogany toe rails on the outward two sides and pad eyes on the inner sides. We'll probably throw a basket there for the things we used to put in the sink (sunblock, keys, etc). It's screwed down to the top from above. The screws are exposed, but it was a lot easier than getting in from underneath and not risking drilling screws up through my varnished plywood top. They are drilled and tapped into the fiberglass, but if that fails they'll just get nuts on the backside.
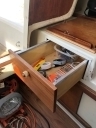
The drawer is from 1/2" birch plywood and very simple. The face is a nicer piece of Baltic birch. I may pirate one of the mahogany plywood covers that are normally hidden underneath the cushions and use it for a new face to match everything else. (The drawer is made such that a new face can be put on it easily.)
Mounting the drawer was more difficult than I'd imagined. I started trying to install rails along the sides of the drawer with regular slides. They were mounted to the face of the cabinet, then hung in back by a single upright that was to be mounted to the underside of the top surface. It didn't work at all. I couldn't get the whole arrangement plum.
Instead I went with a method I have in my fiberglass Scamp trailer. The drawer has a piece of aluminum C channel mounted on the top of each side, facing inward. The C channels grab a square of plywood which is attached to the bottom of the new cabinet surface, so the whole thing hangs from that. It is way, way easier to square that single piece of plywood (it's mounted with a couple of wood screws in oversize holes so it can be wiggled into position and then tightened).
I'm pretty happy with it. I like having at least one drawer for the storage of things that stay in the boat. If it works out, I may move all the electrical from where it is right now, in the forward part of that cabinet, and around under the port side of the berth (where the battery is). Then I can mount a couple more drawers where those panels are right now.
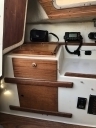
EDIT: I didn't like the drawer face. It was too small for the opening and the wrong color. My dad edge glued a couple pieces of mahogany and I made a new drawer face out of them. Much better, I think. It also allowed me to mechanically fasten the whole thing together.
Getting the drawer face "straight" on the drawer was challenging. As stated above, there's not really such a thing as straight here. The line of the cabinet top isn't parallel with the line of the sliding cabinet face and so the drawer has to choose one to conform to. I had thought of cutting the drawer face so that the top was parallel to one and the bottom to the other, but I was afraid to experiment with such a nice piece of wood.
In the event, I attached a piece of double stick tape to the drawer and pushed it in about 1/2". Then I put the face where I thought it looked right. Then I reached underneath and pulled the drawer out to press the tape against the face. That allowed me to pull the whole thing out and mark it so I could screw it together after removing the double stick tape.