Hatch Board Enhancements Total Page Hits: 1881
Post Type: Technical/Project
Boat Part: Cabin/Storage
Date Modified: 09/19/2022 10:23 AM
There are a number of different ways to construct a set of hatch boards. I won't go into detail on how to construct the boards themselves (2 boards or 3? Plywood or solid lumber? Plastic? Rabbeted joints? Battens? Vents?)
Here are a few enhancements that I don't usually see on other boards:
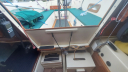
1. I paint the insides of the boards white, partly to brighten up the interior but mostly so I (or the kids) don't fiddle around initially putting them in backwards.
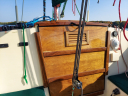
2. A small 1/4" x 3/4" x 6" to 12" batten glued across the inside top of each board serves as a finger grip and makes the boards easy to carry and position with one hand.
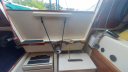
3. A loop of shock cord on the lower board can be slipped over the center board winch and keep the board locked in place in rough weather.
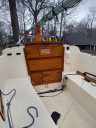
4. A teak louvered vent from Defender is epoxied into a cutout in the top board. It helps ventilate the cabin when the boat is closed up and has never leaked.
5. I abandoned the angled cut joint on the first set I made because it leaked copiously. The angled joint should have let rainwater run off to the outside, and it would have if the cabin face was vertical. But the cabin face is also angled, in the opposite direction of the angled joint. The effect, with the boards in place, is that the joint faces are actually horizontal rather than angled. They invite rain water right in.
I went with rabetted joints with an additional batten on the outside, making a double-rabbeted joint.