Cast Iron Centerboard Repair Total Page Hits: 3081
Post Type: Technical/Project
Boat Part: Keel/Centerboard
Date Modified: 06/03/2016 11:08 AM
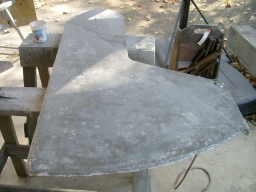
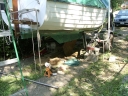
Photo #1 The first thing to do was to free up the centerboard. Lifting the boat up from the bottom, the centerboard stayed right where she was, so I began the process of jacking her up and back.
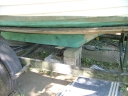
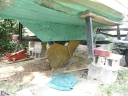
Photo #2 This shot shows how high I lifted her off the bunks. I just wanted to take some of the weight off the crossmembers under the keel, so I could repair the keel roller... it didn't roll, and with the boat pressing down on it, it wasn't likely to fix itself. I repaired the roller, and while I had an inch or so of clearance between the keel and the trailer, I started the job of getting the centerboard to release.
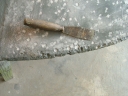
The centerboard itself was protruding about an inch or so from the slot. A whack with a hammer released a shower of rust from the keel slot. I figured the centerboard wasn't going to get unstuck with all this rust, so I kept whacking and rust kept falling. I used a thin flat blade to probe up the sides of the slot, and kept getting more rust flakes. Eventually I noticed the tiniest bit of movement. With more whacking, probing, and cussing, eventually the keel relaxed enough to let gravity have its way, and the centerboard came to rest on the crossmember of the trailer.
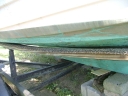
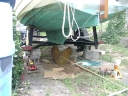
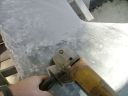
Photo #3 So with the roller repaired and the keel mostly free, I began slowly sliding her back. I used a large, soft old dockline tied to the trailer post on one side, passed this over the top of the bow eye with lots of rags to pad the area, and back to the 'come-along.' Since I wasn't sure this was going to work, I placed a bunch of extra blocks under the boat's stern, but they weren't touching anything... there was about a half-inch clearance between the blocks and the bottom of the boat. This was a "just-in-case" in case I slid the boat too far back. Needless to say, I blocked the aft corners of the trailer as well.
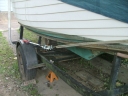
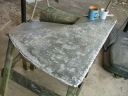
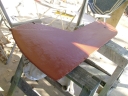
Photo #4 The boat was very slowly slid back on the trailer until the keel slot cleared the trailer crossmembers. Just as reported, the boat balanced quite securely in this position... enough so that I could remove the stern "just-in-case" blocks to access the work area, but I left them in place 90% of the time. I removed the keel stop pin by driving it out from one side, but it had been replaced at some point with a stainless steel bolt. I had to be driven out from one side.
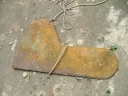
The keel dropped the rest of the way with just a few taps from a hammer. I dug a trench in the ground to give me enough clearance to get the keel out. Here the keel is resting in the trench, but it's clear that the trench needs to be deeper.
Photo #5 Lots more digging and swearing at rocks. The keel is low enough... finally... to access the pennant. I unshackled it and added a rope around the waist of the keel to drag it backwards out of the boat.
Photo #6 It works....Lowering it into the trench shows a small advantage- the trench kept the heavy keel under control. This is about two weeks of part-time work at this point.
Photo #7 "Well, there's your problem, m'am..." the keel was expanded due to rust. There's only one way to clean this baby... sandblasting. By a pro, no less. I delivered the keel and a can of the best primer I could get.
Photo #8 $80 and one can of primer later. After the keel came back from the sandblaster, I could see how deeply the rust pits had eaten into the cast iron. These were filled with epoxy with microballoons and a little bit of fumed silica.
Photo #9 Filling all the pits took a few coats, with each one a little thicker than the last.
Photo #10 I then sanded off most of the expensive epoxy that I added, except for the bit that remained in the pits.
Photo #11 The keel after filling and sanding reasonably smooth. I still have a little more work to do on the edges.
Photo #12 I added one last coat of epoxy to seal everything up, and then a coat of bottom paint. She's starting to look proper at this point. Installation was a reverse of the removal, with the additional grief of having to keep the finished keel padded to prevent gouging up her new finish. All told, it took about six weeks of "a few hours here, a few there" to finish the job.
Brian Gilbert
Webmasters Note: Many thanks to Brian for the pictorial essay. With detailed photos it makes a project like this much less daunting for the person who intends to do a similar job on their M17 keel.
For those visitors who do not know. Brian is a frequent contributor to the Montgomery Sailboat Owners Group E-mail List and, the author of:
Fix It And Sail, The Complete Trailer-Sailor
Published by Marine Media
3404 Hartford Drive
Chattanooga, Tn 37415