Cast Iron Centerboard Repair Total Page Hits: 1694
Post Type: Technical/Project
Boat Part: Keel/Centerboard
Date Modified: 06/03/2016 11:12 AM
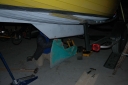
Discussing keel removal on the MSOG E-Mail Forum brought up several possibilities to be considered when pulling the 170 pound, cast iron keel: The keel pivot pin may be an actual pin, drove in when the boat was manufactured and then the keel housing was covered (faired) with fiberglass, epoxy or silicone. Or, the pin could be an exposed, bolt and nut. Variations have also been found with the pin that limits the travel of the keel, referred to as a stop pin. This pin could also be a bolt and nut or possibly an actual pin or just a bolt, screwed into the fiberglass and then faired with fiberglass, epoxy or silicone.
Finding both pins, should be reasonably easy, as they may be exposed, or there may be a dimple in the fiberglass, epoxy or silicone used to cover the pins and, before pulling the pins, this material has to be removed by grinding or digging it out. In any case, the proper (traditionally according to Jerry Montgomery) direction to remove the pins is port to starboard. Or, if the board has been removed in the past, it could be the person who did the repair may not have used tradition, meaning if it is a nut and bolt, take care to drive them out, with a mallet and drift punch, in the correct direction, to not damage the keel housing.
Chad Parrish, a frequent contributor to the MSOG, used the photos from another keel removal page (Bill Sylvester), here on the Photo Site, to help him prepare for this job:
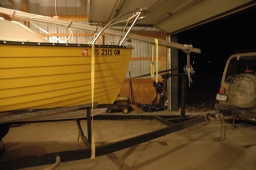
Chad hooked up the boat and trailer to his Jeep, backed it into his pole barn, set the brake and chocked the tires then began set-up by putting a strap across the bow to make certain the boat did not tilt, while he slid it back on the trailer. With the strap in place, he tied a line to both stern cleats which was attached to a ratcheting come-a-long and secured with a chain to one of the steel supports of the pole barn, which are set in concrete and very strong.
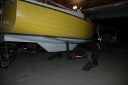
With the boat and trailer still attached to the Jeep, the come-a-long was able to slowly pull the boat back until there was enough clearance for the board to be pulled. When the clearance was sufficient, the come-a-long was released and the boat and trailer were carefully pulled up the ramps (see photos) to give the board the vertical clearance needed to lower.
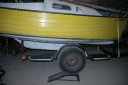
The jack in the photo is an ATV/Motorcycle jack, purchased from Harbour Freight, which Chad says worked reasonably well for the purpose of removing, holding and reinstalling the heavy centerboard.
Other items discussed on the E-Mail Forum:
A tip from Jerry Montgomery: The line used to raise and lower the CB is 5/16... The trick is to cut away about 4" of the internal core and use that part to tie off at the CenterBoard, making the knot small enough to fit properly in the CB Trunk.
After completion the best way to be sure there will be no future damage to the stop pin, it is recommended to put a knot in the centerboard pendant (line) to prevent the board from pounding against the pin; lower the board fully against the stop pin, then lift it up an inch and mark the line for the knot. Some wrap this knot with sail tape to effect a plug, preventing water from entering the cockpit through the pendant hole.