Battery Box Total Page Hits: 1640
Post Type: Technical/Project
Boat Part: Electronics/Navigation
Date Modified: 06/05/2016 11:38 PM
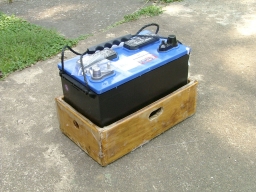
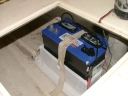
I wanted my battery tray to be seriously strong, since a loose battery in a seaway could inflict some serious damage in a good storm. The group 27 battery is heavy- about 60 lbs or so - so I wanted to locate this weight along the centerline of the boat, rather than at its stock position on the port side. This means access is difficult... since there is no hatch directly above it, the battery must be lifted up and shifted to the side before it can be removed. This limits the height of the sides, which are about 5".
The USCG has specific requirements for battery boxes, and my design DOES NOT comply with the requirement that the terminals be covered so that a dropped metal item cannot short the terminals. I need to add a safety cap to the positive terminal, and I believe you can buy them at auto parts stores. The CG prefers that the batteries be completely covered and well-ventilated to allow hydrogen to escape while charging. The battery tray needs to be corrosion-proof to contain any spilled electrolyte, and the epoxy and fiberglass laminate fits the bill nicely (By the way, did you know that,according to Chapman, 64th edition, salt water will react with battery acid to form chlorine gas? I think this was used in WW1 trench warfare to dispatch enemy troops via a particularly horrible death, and I have no desire to re-enact even the faintest whiff of those good old days.)
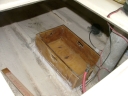
To build the box, I used 3/4" exterior-grade plywood. I screwed and glued the four sides to the base, then I rounded all the edges well with a round-over bit in the router (except near the screws... there I used a coarse resin-bonded sanding disk in a side grinder.) It's essential to round these edges because the fiberglass doesn't like to lie along sharp edges, and rounded edges are safer and stronger in general aboard. All surfaces of the tray were given a coat of unthickened epoxy and left to cure. The epoxy soaks into the wood, giving a better surface for the next layer. Once this epoxy "primer coat" cures, I washed off the amine acid blush with soap and running water, and let dry. The almost-final coat was a layer of light fiberglass set with epoxy. (I never use polyester for boat work anymore.)
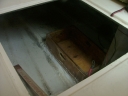
The boat's bottom was lightly scuffed where the box would mount, to remove old paint, dirt, and general bilge grunge. Things don't generally stick to general bilge grunge. The tray was set into place using a nice, thick bed of PL Premium polyurethane sealant, which behaves very much like the more expensive marine-grade stuff (though for below-the-waterline fittings, I only use the real thing, i.e., Boatlife). After this cured, I added a rounded fillet to the sides and bottom using epoxy thickened with microbaloons and a little fumed silica. While the fillets were still wet, I gently placed some strips of fiberglass along the sticky surface of the fillets and left it to cure overnight. The next day, a brush of epoxy finished out the laminating and the battery tray was effectively a part of the hull laminate. I finished off with a coat of white paint, mainly for appearance.
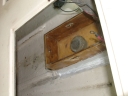
Yes, this construction is probably overkill, but I'd much rather overkill this one than find out the hard way that it wasn't strong enough. I've seen no evidence of problems in two years.
Information and Photos by Brian Gilbert
Author: Fix It And Sail & The Complete Trailer-Sailor
Marine Media, 3404 Hartford Dr, Chattanooga, TN 37415
Visit Brian's Web Site for further information
www.sailingsmall.com